
NOTE - I created an independent project in order to automize some math
In this article, I'll try to explain how to (approximately) locate and identify any host on any WiFi hotspot, encrypted or not (link layer frames), using triangulation and some tools.
The purpose is to find an anonymous user who spoofed his MAC and consumes all the bandwidth by downloading Game of Thrones.
The exact mathematical therm is Trilateration actually.
So, let's say that we have a typical setup:

Many devices are connected to a single router, in fact, it also can be done with multiple bridges.
Our task is to estimate the location of a precise host (not only the router it-self), in order we can map it.
For now, we need to see the MAC addresses connected to specific AP (access point) and their RSSI in dBm (Received signal strength indication in decibel-milliWatts).
For that we can use WiFiChannelMonitor for Windows or (in our case) Kismet. One can try AirCrack-NG as well, but there are some tricks to add, like frequency channels, ACK/CTS/RTS frames and BSSID associations.
Just after launching Kismet, you should see a prompt for server starting, just press Tab (for navigation) and Enter (to select) Yes :

Name it like you want and Start :

Then, you will have to specify your network interface for promiscuous mode :

Just select your WiFi card or an already monitored interface (like mon0) :

Finally, just close the Console Window :

Now, you should have a pseudo-gui interface :

So, let's find a WiFi hotspot, by applying ESSID filtering (pressing Esc) and navigating using arrow keys :

Then just select (without Enter) the hotspot and you will see all the clients (MACs) connected to the network.
If you select it (Enter), you will see more details (I'm using 5GHz WiFi and not 2.4GHz like most of you) :

OK, let's see the details for the clients (by pressing Esc) :

Lastly, we will need to see their electromagnetic emission power (signal) level (basically, a decibel (power ration) for milliWatt (electricity consumption)), which is not displayed by default :


Now, we are ready :

Kismet will also show the manufacturer (based on MAC vendor) and you can sort them if you want.
Note that even if you return to main window, you will still see the power level :

OK, as you can see Kismet measured the power of my router (67 dBm) and of my smartphone (30), I'm using cable for my PC, so it's not displayed.
Based on such values, we can estimate the distance, but it will be better if we could calculate an approximation, what I did :

You just have to specify the AP frequency (displayed by Kismet as well) in MHz and the host power level (dBm).
The source code of the script can be found on my GitHub.
The formula that I used isn't the most precise (especially if you would make tests with different frequencies), but it's sufficent for our practical purpose.You can also, calculate logarithm with bc by the way, but I know that some of you are using Windows and not big fans of Cygwin, so I decided to make it as portable as possible, thus writing the code in Python.
So, now we know the distance, my smartphone is on my right (15 cm), so it's pretty easy to locate it in this case, but what about the router (10m)? Here's where triangulation (or trilateration) comes in place.
I'll use Gimp as a graphical editor, but you're free to use what you're more comfortable with (PhotoShop, Paint, etc).
So, let's make a square image of 500x500 pixels, which will correspond to 50x50 meters :

And make a circle with radius of 100 (10 meters), thus a diameter of 200, which is equivalent for a flat (not circle) surface of 200x200 (20 meters), or you can just enter 100x100 for simplification :


Just for better comprehension for the next part, let's color it as well :


Alright, we are at the center of the circle (my room), and the host can be anywhere on the end of the circle.
So, let's move like 5 meters backward (half of the radius) and measure the distance again.
From my kitchen, it will be 6.5 meters, so let's trace one more circle :

Now we can be sure that the host is located either few meters left, either few meters right.
If we decided to step forward or to the side, the distance will increase, but we will still have the two points of intersection.
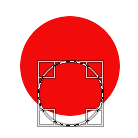
So, let's make the final 3rd measurement stepping backward again and right few meters to my guest room, and measure 3.3 meters :


If we decided to step left, the distance would increase once again, but we will still have our unique intersection point (I just don't have that much place in my apartment).
OK, now we know almost the exact position, which was right lower corner from the beginning (my room) :

As you can see, it's quite simple and can be automize, but not easy to develop at large scales considering different antennas, obstacles, etc
I hope that you have learned something about WiFi, physics, radio and math.
Now if someone would say "it's anonymous to spoof MAC and connect to WiFI", you should have a smile and remember my article.